
The path is the address of a folder or file on a computer. While it is quite easy to copy paths with some other operating systems, most mac users, especially those new to mac, find it quite hard to do. With the guideline on this page on how to copy path in Mac, you’ll be able to do it in a breeze.
There are different ways you can choose to copy paths in mac. You can either copy through the keyboard shortcut, terminal app, or Automator app. Each of the mentioned methods is simply effective, and we will share the steps with you below.
Key Takeaways:
- To copy the path in mac, you need to use your Finder. It doesn’t matter the method you choose; the finder makes it easy to do.
- You can also copy the path in mac using a keyboard shortcut (discussed below).
- Terminal app and Automator apps are also effective methods to copy paths in your mac. However, you need to go through the finder to use the two methods.
How to Copy Path in Mac?
As said earlier, there are three methods we will share with you on this particular topic. While there are other methods to copy paths in Mac, we choose the three as the best and simplest ones.
Remember that you do not need any prior experience to do this. You can easily copy the path in Mac through the steps you are about to read below.
Using Keyboard Shortcut
The first step on this page is using a keyboard shortcut. Well, you might not be hearing that for the first time, thus proving to be the most effective and popular way to copy paths in Mac.
Let us go through the steps.
- Open your mac laptop and navigate to the finder on your Mac.
- Locate the Command button on the keyboard.
- So, to copy path in mac, press the Option + Command + C.
Note: just as the command button + C means copy in other PCs, it is the same with a Mac laptop.
Looks simple, right? Just as said earlier. Now, let us get to the next method of copying paths in mac.
Using Terminal App
The next method is through the use of a terminal app. Although the terminal app is primarily used for executing commands, in this situation, you can use it to find a path in your Mac. So, follow the step below to copy the path using this method.
- First, you need to get to your finder, click on “Go”, and then on “Utilities”.

- Then launch the terminal app on your Mac.
- You should locate the file you need its path and then drag the folder into the terminal window.
- The outcome works like magic as you will get to see the full path of the file immediately on the screen. For example, if the file is located in your app folder, it will show the app path, and you can go on to your next step.
- Go on to highlight the path and then copy it to the destination you intend to keep the path.
And that’s how you use the terminal app to copy paths on Mac.
Related Reading: How to Go to the Root Directory in Mac?
Using Automator App
The next method is through using the Automator app. Of the three methods, this one requires lots of effort on your part. You have to create an Automator service, and the best way to do that is through the copy-to-clipboard feature on your macOS.
You cannot copy paths without this service. Therefore, once you have created it, you will automatically have a copy path option in the menu for all folders and files in your Mac.
It might look quite difficult at first, but following the procedure below, you should find it easy to do.
Click on the Automator app on your mac to launch it. to find the Automator app in your Mac for beginners, follow the step below:
- Open the finder and click the file tab and type Automator in the search bar.
- Click “Go on Finder” and then to “Utilities” and search for Automator.
- You can also click the finder to launch and the go-to application to find the Automator.
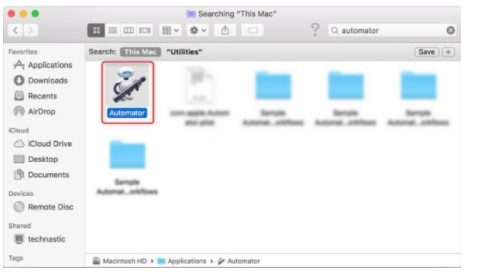
Those are the three ways you can find Automator in your mac.
Select Automator with each of the methods and launch.
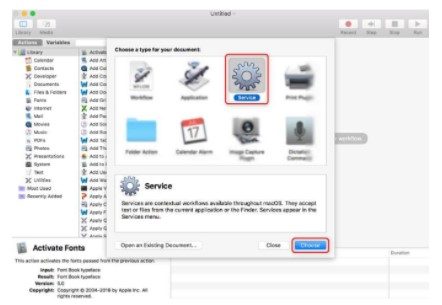
Go on to select Service as seen in the image.
Then you will use the search box by typing a copy to clipboard.
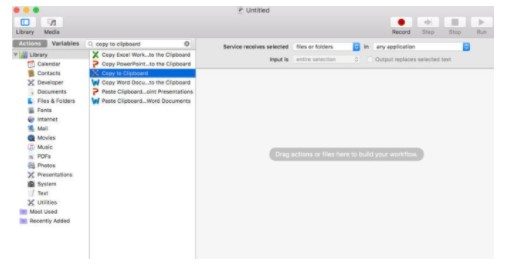
You need to drag the copy to the clipboard into the right side of the window.
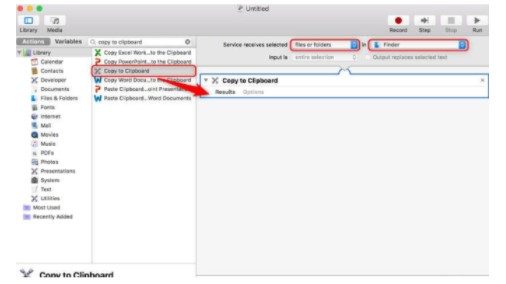
After that, you have two options to configure, as seen in the image below.

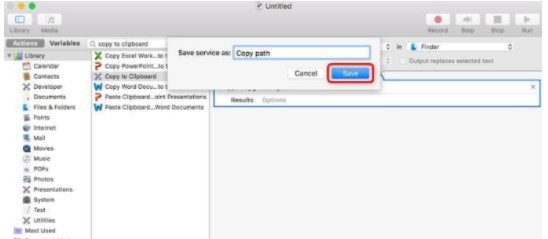
Then go on to click on the File, choose Save, and then you can save as a copy path to the clipboard.
Now, with a right-click on the finder, you will always see the copy path you created in the context menu.
Conclusion
How to copy path in Mac laptops? Copying file paths is no rocket science, and can be done with a few simple clicks. This article shows you three main ways to do it, with using the keyboard shortcut being the easiest one. if it is your first-time copying path in Mac, you should use this process.
However, any of these three methods will always get you the best results as long as you follow the steps correctly.