
The BIOS is an essential component of any computer since it allows users to control numerous aspects of their systems.
BIOS stands for Basic Input or Output System. It is a computer software normally stored on Flash memory and utilized by the Processor to complete beginning operations as soon as the power comes on.
Different computer/laptop brands have different Bios key that is usually only accessible during booting. Today in this guide, our focus will mainly be on Dell Bios Recovery Key.
Thus if you are a dell user looking for a bios recovery key, make sure to thoroughly go through this guide.
Table of Contents:
- Bios Recovery key varies between different models of laptops
- Dell Primarily uses BR2 and BR3 as Bios recovery tool
- You can recover the bios on Dell laptops by yourself following 6 easy steps.
- Always charge your laptop beforehand when you are attempting Bios recovery.
- Older Dell laptops take more time for Bios recovery than newer models.
What Is Dell Bios Recovery Key?
Different models of Dell laptops have different BIOS keys; F2 or Fn+F2 is the Bios key for Dell Inspiron and Inspiron One, Latitude, and All-in-one. The BIOS may be accessible on Precise devices via pressing F12 or Fn+F12.

When the Dell logo displays, press the F2 key to begin System Setup. Sometimes this might not work, and you may need to try a different approach.
As the LED’s keyboard blinks press the F2. Do keep in mind not to keep holding it because the system may perceive it as a locked button.
Down below, we will look into how to access Bios on different models of Dell Laptops. Follow these steps to access the Bios easily.
Older Dell Laptops
- Step 1: Either reboot or turn the laptop on
- Step 2: When You will see the Dell Logo, you will need to press Enter + Alt + Ctrl together.
- Step 3: The Bios will load automatically. You may need to wait a few moments for the BIOS to load up as older Dell laptops are slower compared to new ones.
Dell400
- Step 1: Turn on your laptop usually, the same way as we did with older dell laptop models. To enter the BIOS, you must first view the display screen.
- Step 2: As soon as the BIOS information comes up on the screen, press either the F3 or F1 key on your keyboard
- Step 3: If prompted, enter your password. Ensure to save your modifications if you implement adjustments in BIOS.
Optiplex, Precision, Latitude, and Inspiron
- Step 1: Turn your laptop On like you normally do
- Step 2: For Inspiron and Latitude, press the F2 key as you see the Bios provider on the screen. However, for Dimension and Optiplex models, press the DEL key. The rest is the same.
- Step 3: Now, if your laptop is password-protected, it will ask you to give the password. After you are done with BIOS modifications, restart the laptop, and you are done.
Dell 4400
- Step 1: Restart your laptop
- Step 2: Keep sitting in front of your laptop when working with Bios (timing is crucial here). Hit the F12 immediately when you see the Dell logo on display. Tap it till you get the phrase Begin Setup.
- Step 3: Enter the password if required. Restart your laptop after BIOS is finished.
Dell Bios Recovery Tool
Before learning about the Dell Bios recovery tool, we need to understand what exactly is a recovery tool. It is used to repair a BIOS that has become corrupted; Most times, it’s either a boot or a POST issue. Boot Block Technology underpins them.
Dell has two types of Bios recovery tools; one is BR2 or BIOS Recovery 2, and the other is BR3 or Bios Recovery 3. One of the probable causes of a computer failing POST or Boot is a faulty BIOS. However, if your Dell laptop or Pc supports BR2 or BR3, you can recover it.
Bios Recovery 2 (BR2)
BR2 has features that will help recover data from your laptop’s hard disk and from an external USB drive. The BIOS has default recovery built-in from the hard drive.
If there is a USB drive, the Bios will look for a recovery image inside it. If it can’t find it, it will look into the main hard disk. The search will end if it can’t find any recovery image.
On Dell laptops, BIOS recovery 2 may be started using the inbuilt keyboard, and on Dell flexible or foldable computers, it can be created using either an external keyboard or the physical buttons on the machine. However, the device’s touch screen cannot be used to start the BIOS recovery process.
Bios Recovery 3 (BR3)
The Latest Dell laptops and computer uses the BR3. which is a step forward from than BR3.
It contains all of the same capabilities as the previous version, plus the ability to initiate auto recovery at boot if a pen testing that must be set in the BIOS fails.
A recovery image is present on the HDD. In contrast, other media cannot be used for auto-recovery.
Have A Look: Do Data Recovery Companies Look At Your Files?
How To Recover The Bios On A Dell Computer?
It is possible to recover Bios in a Dell computer by following the steps we will mention below. Precisely follow these steps, as they are pretty critical, and if you miss any step, you will be in more trouble.
Step 1: Charge your laptop
Ensure that your laptop has sufficient charge and doesn’t shut off during the BIOS recovery process.
Step 2: Turn off the laptop
Now you will need to turn off your laptop and also disconnect the charging adapter from your dell laptop.
Step 3: Connecting Back the AC adapter
Now press the ESC and CTRL keys from the keyboard. Keep holding the keys for a few seconds and connect the AC adapter back at the same time.
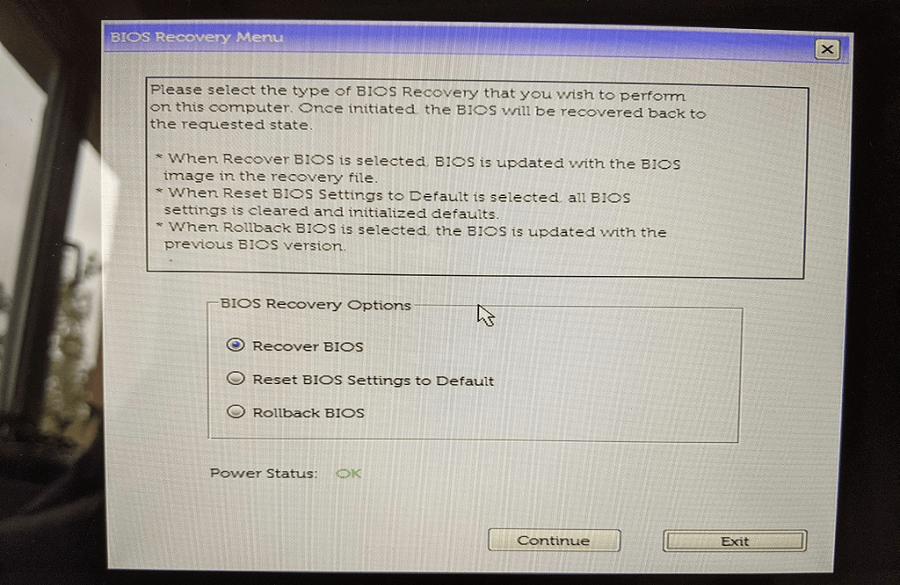
Step 4: BIOS recover screen
When you see that BIOS recover screen on your display, release the ESC and CTRL-key, but make sure to keep holding the keys until you see the recovery screen.
Step 5: Reset NVRAM
If you see the disable NVRAM in the BIOS recovery screen, select that and press Enter key on your keyboard. Make sure to preserve the existing BIOS settings, choose Disabled, and hit Enter.
Step 6: Recovery
This is the last step of your Bios recovery. Keep looking for the recover BIOS option on your screen. Select the recovery option and again hit Enter Key. The recovery process should start automatically.
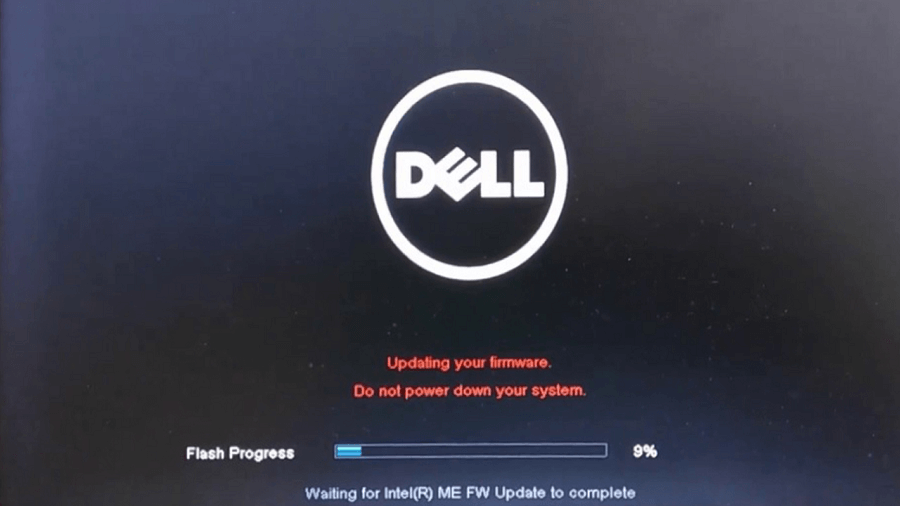
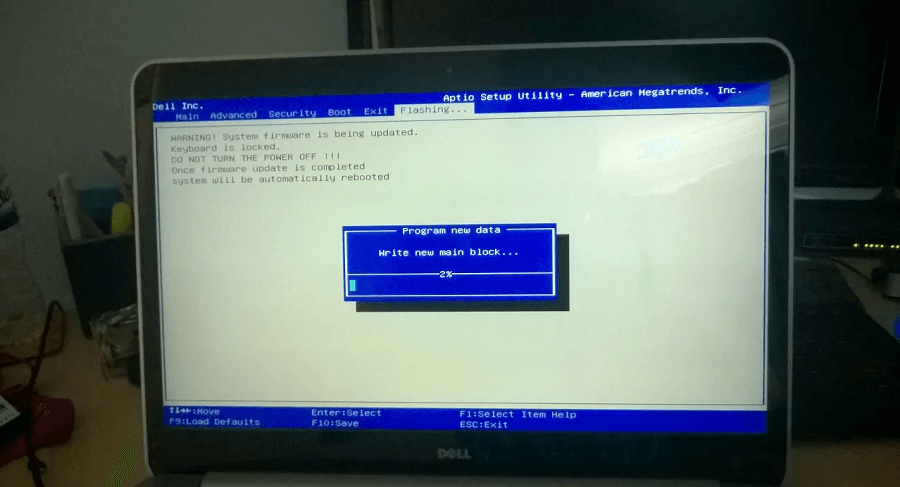
If you have successfully followed all other previous steps, as we mentioned above, your BIOS should be recovered by now.
However, the process can take between 20 minutes to a few hours to complete. So, keep patience and do not disconnect your AC adapter during Bios recover. Make sure that the power source is on.
Do not worry if you see that your laptop is restarting a few times during the recovery process, as it is very common during BIOS recovery. You do not have to do anything when the laptop restarts. Just let it do its own work.
Conclusion
Dell Bios Recovery key varies for their different laptop models. But today we tried discussing about recovery key of most common models of Dell laptops.
Bios recovery process is a bit complicated and if you do not know what to do after what recovering bios can become impossible.
Hence, if your Dell laptop’s Bios failed and you are looking for solution on how to recover it. Read this guide and we hope you will be able to recover your Bios.